Saturday, June 1, 2013

Amazon Nail Art Supply Review - EGoodForYou (Plus my first mani with Water Decals)

Today I wanted to share with you my experience with an Amazon seller, EGoodForYou.  Just to clarify, I purchased all of this on my own, after seeing this post on Reddit.  I of course immediately decided that I couldn't live without the ability to make goldfish nail art, so I looked up the seller she mentioned.  I bought all 3 goldfish decal sets left, and then they had free shipping over $25 (although now I think it's been changed to $19.99), so I decided to get a few more things.  Here's all the stuff I got (I left out the doubles/triples of the water decals).  Everything that wasn't on clearance was in the $3-4 range.  Their prices are mostly around $3.49-3.69 or so.  Even for a single mani, that's not bad, but way more than I'd pay.  But with all these packages, you could make it last multiple manis by only doing accent nails, and many of them have enough stickers/decals that you could do more than one mani even using decorations on each nail.


These are stickers, not water decals.


As are these.  These were on clearance, I believe.


Fishies! They come with 10 "nails" outlined, but I'm pretty sure you could cut them up into the individual fish.  I haven't tried this design yet, though.


Same with these seashells.


Here were the goldfish.  I would have liked it better if there were different types of goldfish, but I'd probably only use one or two at a time as accent nails anyway.


Some pretty flowers.  I don't remember if these were on clearance, or I just really liked them.

And now for the freebies.... On each item description, it says something like, "With free flower sticker," so I assumed it meant just a single sticker.  Nope, that's apparently not what it meant.  First of all, I got this set of water decals for free with my order.  I don't absolutely love the design, but it was really nice of them to do!


So. Many. Flowers.


A pack of these came with EACH decal/sticker set I ordered.


How awesome is that?!


There were a variety of different designs, too!


Once again, I left out the doubles, but when I ordered multiples of one of the water decal sets, each of them came with the same "bonus" sticker set.


I've used the white flower stickers for two pedis so far.  While I change my fingernails ever couple days or so, my toenails usually stay the same for weeks at a time.  The first set stayed perfectly fine for almost 2 weeks (and then I removed them, the stickers weren't peeling off or anything), and the second set, I just did today.  I did run into an issue of stickers tearing when I tried to remove them from the backing, but it was probably at least partially due to the way I was taking them off with tweezers.


And now, my water decal mani.  These were easier to use than I was anticipating, although I did have a couple small issues.  First of all, make SURE you remember to take off the clear plastic covering.  I ruined one of my decals by forgetting to do that.  It stuck to the thick plastic cover and I couldn't peel it off to use it.  In the comments of the post I linked above, there is a video of the process, if you'd like to check that out.  The way I did it was to slide them off the paper with my finger, then gently lay them on the nail and position them.  Unlike stickers, you can slide them around a little bit before you blot the water off of them.


As you can see in the picture of the package earlier, the set comes with 20 decals--enough for 2 full manis using one on each nail.  I only did accent nails, so as to stretch them even further.


For the base, I used NYC Safari, with China Glaze Swanky Silk sponged on top.  I loved the effect it gave, especially in the sunlight, but I'm still not sure how much I like the actual color of Swanky Silk against my skintone.


Close-up!  I was impressed with how nicely most of these went on.  I think one may have folded a bit, but that was from me messing with it too much.  They all went on smoothly and there are no bumps or ridges, especially after a coat of topcoat.  You should definitely apply topcoat to seal them on, though, otherwise I think they'd peel off fairly easily.


Overall, I'm SO happy with this purchase, as well as with the service I received.  They shipped so quickly, and their customer service was great.  In the initial shipment, one of the decal sets I'd ordered had been left out.  I emailed them about it, and they replied quickly, and sent the item out soon after that (I emailed on a weekend, when the warehouse was closed and not shipping out orders, so it took til Monday).  Everyone makes mistakes sometimes, and it doesn't bother me that there was this slight issue, because they handled it well, and that's what matters more to me.  I actually just placed another order earlier this morning.  I think now I should be set on decals for quite some time.  


Monday, May 20, 2013

Recent Manis

I've mostly been posting pictures of my manis to Reddit lately, and neglecting to write about them here, however, I like talking about nail polish, so now I'm going to do this, too.  The first non-solid mani I did recently was another cloud one.  I liked the contrast of the glass fleck polishes with the creme center, and the colors I used were CG Watermelon Rind, Sally Hansen Mint Sorbet, and CG Blue Iguana.  It did get a little thick at the tips, though, because Blue Iguana was so sheer I needed two thick coats of it to make it look as dark as I wanted.


This next one was a lesson in simplicity.  I began with a base of Pure Ice Temptress, which is a glass fleck polish, but has a finish similar to the OPI Suede line in that it dries partially matte.  I then used striping tape over 3 nails to create a lattice pattern which I painted over with Pure Ice Femme Fatale.  I really liked Temptress, though, and I wanted to leave more of it uncovered, so I just dotted Femme Fatale on my remaining two nails.


I then decided that I didn't want to do such an elaborate design on my right hand (also I'm pretty sure I was running late for class), so I did simple stripes, and ended up liking them much better, although I liked the purple with green stripes a lot better, so I wished I'd done the colors reversed.


Words cannot describe how in love I was (and still am) with this mani.  I left it on for three whole days!  I used a base of China Glaze Unpredictable, which I absolutely adore just on its own.  Then I taped and painted over with CoverGirl Midnight Magic, a gorgeous fleck polish with lots of colors from green to purple to grey.  On my left hand, the stripes ended up farther down than I'd wanted, so I used some dots to fill in the space.  I liked the design on my right hand, without the dots, better, though.


Also, exciting news--as of last week, I'm employed!  Unfortunately, it's for my school's Grounds department, which means lots of opportunities to ruin nails. :(  It was my first choice for a job, though, so I'm really happy about it:  lots of time spent outside (which I may regret this summer when it's 110), I got to pick the number of hours I wanted to work AND my exact schedule, and all the people I work with are amazingly friendly and nice.  

Tuesday, May 7, 2013

Neurulation Nails

In order to better prepare for my first developmental biology exam, I decided I should paint one of the diagrams on my nails, and neurulation seemed to be a fairly simple concept.  The diagram I was going off of was one in a handout the professor gave us, but this one is close enough:


It turns out that the way I painted them (with the smallest, skinniest stage on the smallest nail) makes it rather difficult to get a picture of them looking like they're "in order" for the sequence, so I gave up on that and just photographed them this way.


And here's a cross section of the ectoderm, neural tube, mesoderm, and endoderm.  The design ended up looking a lot more shaky than I'd hoped, probably because I used a dotting tool to draw the entire thing.

I don't remember exactly which colors I used, as I had a whole range out experimenting with which ones looked best, but I know the blue is from Cosmetic Arts, the teal is China Glaze Four Leaf Clover, and the white is Sinful Colors.


Recent Manis

Recently I haven't done anything that I felt was exciting enough to make a whole post on, with the exception of one mani which is coming up next.  I have, however, been using and discovering a lot of pretty colors, and I'd like to share those with you now.

First up is an unnamed creme purple from Cosmetic Arts topped with Wet n Wild Caught on Sapphire.  I grabbed the bottle thinking that for $1.99 it might be nice to have a large bright blue glitter.  When I swatched it, though, it came out much more complex and intense than I'd anticipated, and I was so in love with it that I left this "plain" mani on for almost 3 days.


It's got the larger blue hexes, which almost seem luminous in certain lights, as shown above, as well as a microshimmer that's sort of blue and purple iridescent, which shows better in the photo below.  Unfortunately, this polish was a bit hard to use.  You certainly don't have to worry about the glitter being too sparse--the application you see here was the result of much effort to end up with a light sprinkling of the large hexes.  It's suspended in a rather thick base, though, so when you finally get just a few pieces on your nail, there's very little chance that they're spread nicely, rather than in a single clump on the side of your nail.


I knew that I wanted to use Color Club Snowflakes over something, but I wasn't quite sure what.  I swatched it over several colors from purple to red to green before deciding to try it over a dark navy, Rain Storm by Sinful Colors.  The result, in my humble opinion, was utterly stunning, and I put the chevrons, in Salon Perfect Gold Leaf, on it just so I could call it nail art, after I considered stamping it but didn't want to obscure the gorgeous opal-esque finish.


Aaaand for some reason, I'm currently obsessed with chevrons.  Or striping tape.  Or maybe both.  Inspired by a design I saw a while back, but sadly lost the link to, I used striping tape to create this design of Pure Ice Jail Bait (???) over Sally Hansen Shoot the Moon, a color I've had on my mental wishlist since I first saw it, and finally decided to buy on Friday.


As you can see (maybe), I messed up the index finger and smoothed it back out in that picture, and I'd ruined my thumb beyond saving, so I took it off later that evening and put on Color Club Kismet for spending Saturday afternoon in a sunny park.  That evening, I couldn't leave it alone, though, and ended up attempting the double chevron design again with NYX Girls Charcoal Pearl.  Someday, I will learn to get my stripes uniform.  Someday....


I think the fishtail design looks really cool, but I hate hate HATE when polish is just "piled up" on my nails, and this mani is a particularly bad offender for obese nail tips.  I did this one yesterday, and I really loved how it looked at a distance (i.e. looking at my hands in a mirror), but I didn't like how it looked up close.  The color combination was really nice, though, Sally Hansen Blue-Away (not Blue Me Away), Mint Sorbet, and Coral Reef.


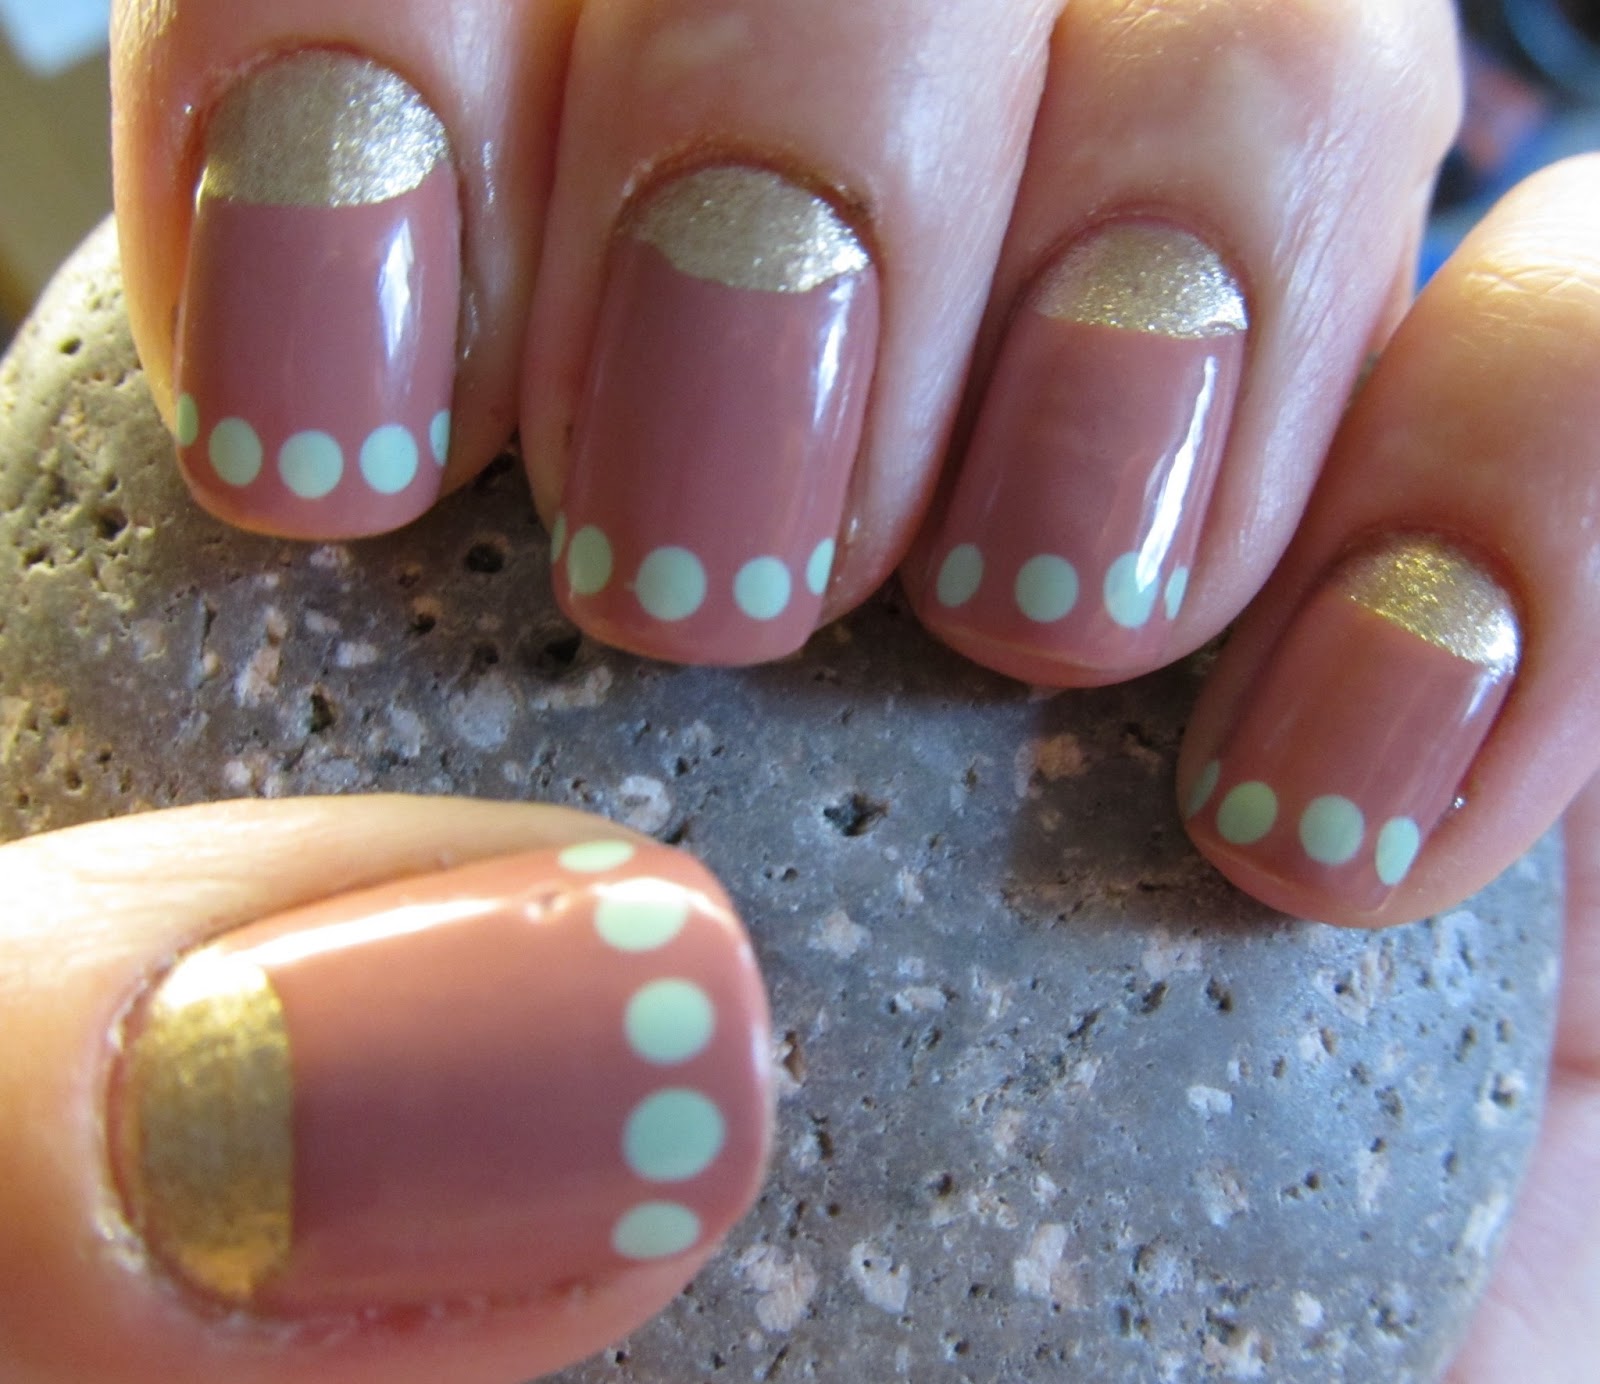
Finally, this is my current mani, which I'm really in love with, but also wanting to take off to try other designs. I bought this gold, the same Gold Leaf color from Salon Perfect I used in the flakie mani earlier, for use as the "half moon" color in half moon manis, so I guess it's serving its purpose quite well.  Over it, I painted Sally Hansen Pink Pong, then dotted Mint Sorbet.  I think it's just complex enough to be interesting, without being over the top and "too busy."


Well that's all for now!  Hopefully I'll find some better inspiration for some actual nail art sometime soon, but in the mean time I'll try to share more in depth reviews of the polishes I'm using, especially ones that have recently come out and/or are still in stores.  (A personal pet peeve of mine is when someone reviews products or colors from a line that was discontinued years ago and no longer readily available anywhere.)

Saturday, April 20, 2013

Feather Nails

I've seen various pictures and tutorials for feather nails since I got really into nail art.  It always looked really cool, but also time consuming, so I never gave it much consideration.  Some time about a week ago, though, I got it into my head that I wanted to try feather nails, so when I was at Walmart, I bought a pack of 50 feathers, figuring it'd be enough for several manis.  The bad news is, there were so few small feathers in it that the ones I used here were probably the only usable ones in the entire bag.  The good news is, my first attempt went much better than I'd ever envisioned!


My process for this was to start with a base of 2 layers of Rimmel Caramel Cupcake.  I let that dry, then put on a coat of topcoat.  While it was still a little wet, I stuck the tips of the feathers on, then immediately put on 2 thick coats of Out the Door.  I let that dry a while, then clipped the ends of the feathers off the nails (if you put the topcoat a bit farther out on the feather, it makes it easier to remove).  I then put another coat of OtD on, waited about half an hour, then went to bed, as it was 3 in the morning.  The next day, I filed down the little bits of feather still sticking off the nail, and put on a two final coats of OtD, and voila!  The most layers of nail polish I think I've ever put on!

I took pictures of each individual nail, but when I looked at them later, some were blurry so I left those out.  I also didn't realize how absolutely awful my cuticles looked in these pictures until I'd already taken the polish off.


The only nail the feather actually fit nicely.


So many bubbles.... This nail was definitely the worst though.


I really liked the colors on this feather better than most of them.


So as you can see in the closeups, they're not amazingly Pinterest-perfect, and I got a lot of bubbles in all the layers of topcoat, but I really really liked them, and I actually left them on for 3 whole days because I didn't want them to go away.  I want to try them again at some point, but I'll either have to find a better place to get feathers (JoAnn probably has some, but I have to drive a bit to get there, whereas Walmart is right near my school), or keep buying a whole bag of feathers to do one mani.


Tuesday, April 16, 2013

Beige-to-Bright Gradient with Dots

Inspired by this mani that I saw a while ago, I decided to try and use that idea to satisfy the thought in my head that I wanted a mani that was neutral with bright tips.  I think the design definitely looks better with the dots, rather than just a beige to bright gradient, but I'm not quite sure if I like it or not.  


I used a shimmer topcoat which I think is limited edition, currently available in special displays at Rite Aid, called Shimmer Blast.  It's an iridescent "rainbow" microshimmer polish, but it definitely leans toward the blue/purple end of the spectrum, which was why I figured it would go nicely with all the blue and purple shades in this mani.


Colors Used
Base - Ulta Set the Nude
Thumb - Cosmetic Arts unnamed purple
Index - Sally Hansen Pacific Blue
Middle - Sally Hansen Blue Me Away!
Ring - China Glaze Four Leaf Clover
Pinkie - NYC High Line Green
Topcoat - NYC Shimmer Blast
Related Posts Plugin for WordPress, Blogger...